
BallEngine

Crowd Evacuation 3D:
Everyone out before the clock

Thousands of individually simulated people, a handful of doors, and jams at every doorway that nobody scripted.
Play the preview

In development0 creators want this next

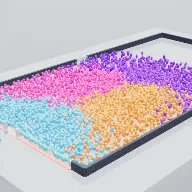
A frame from Crowd Evacuation 3D
Open the studio to run this mode live.

Crowd Evacuation 3D is being built right now

The engine, the physics and the look are done enough to watch. What is not finished is everything around them: the settings, the presets and the export path. So we shipped it as a preview instead of sitting on it.

The order is decided by these votes rather than by us, and the most-voted modes go first. If this is the one you want, say so.

What you can do now
Open it in the studio and watch a full run, with sound, exactly as it stands today.
What is held back
Settings, randomize and export. The preview runs on our defaults so every viewer judges the same version.
When it ships
The most-voted unfinished mode is the one we take next.

What Crowd Evacuation 3D does

Several thousand individually simulated people trying to get out of a hall before the clock runs out, jamming the doorways exactly as real crowds do.

Crowd Evacuation 3D puts several thousand individually simulated people in a hall with a handful of doors and starts a countdown. The goal is to get everyone out. The counter is live, the timer is visible, and the run can fail.

What makes it worth watching is that the payoff is not authored. A social-force crowd model spontaneously forms arch-shaped jams across every doorway, which is a well-known result in crowd dynamics, and the faster-is-slower effect means the counter genuinely stalls as urgency rises. Nothing about the jam is keyframed. It is what the forces do.

It is also the rare mode that needed no invented retention mechanic. It arrives with a goal, a timer, a failure state and a live counter already built into what it is, which is more structure than most formats get after a redesign.

How a run plays out

The exact sequence the engine runs in this mode, from the first frame to the moment the run resolves.
  1. 1.

    People choose an exit

    Each person picks a door and heads for it. Exit choice is a per-person decision, which is what produces uneven loading across the doors rather than a tidy split.

  2. 2.

    Social forces push them along

    Each individual is driven toward their goal and pushed away from neighbours and walls. There is no crowd object; the crowd is what several thousand of these produce together.

  3. 3.

    Doorways arch and jam

    Pressure at a door forms an arch of bodies across it, which is the classic clogging result. The arch holds, releases, and reforms without anything scripting it.

  4. 4.

    The counter stalls under pressure

    Higher urgency increases the pushing, which strengthens the arches and slows the flow. That is the faster-is-slower effect, and it is why the counter can freeze at the worst moment.

Every control in Crowd Evacuation 3D

These are the settings this mode adds on top of the shared physics, visual, audio, and export controls. Names match the studio sidebar exactly.

The arc

  • The Arc
  • Phase Caption

The phases give the run its structure, and the caption states which one is active so a viewer knows whether things are getting worse.

Crowd

  • The Crowd
  • Body Shape
  • Crowd Physics
  • Exit Choice

Exit choice is the most interesting setting: whether people head for the nearest door or the emptiest one completely changes how the jams form.

Exits and room

  • The Exits
  • Exit Layout
  • Show Room
  • Wall Color
  • Exit Color

Door count and placement decide the difficulty. Fewer, narrower doors produce stronger arches and a genuine risk of failure.

Look and audio

  • Color
  • Color Mode
  • Gradient End
  • Alert Color
  • Audio & Music Sync
  • Override Audio

A gradient across the crowd makes flow visible, because you can see which part of the hall is moving and which part is stuck.

Why Crowd Evacuation 3D videos hold attention

What keeps people watching this mechanic.

The goal and the clock are built in

Get everyone out before time runs out is a complete premise with no explanation required and a real failure state.

The jam is a genuine setback

A stalling counter is frustrating in exactly the way that keeps people watching, and it was not scripted to happen there.

Scale is immediately legible

Several thousand individual bodies moving together communicates size and stakes without any caption.

The outcome is uncertain

Because the jams are emergent, two runs with the same settings do not necessarily both succeed.

Videos you can make in this mode

Each of these is a different configuration of the same mode, so one setup session produces a batch of related uploads.

Standard evacuation

A full hall, several doors, timer and counter on. The clearest version of the format.

One door

A single exit so the arch forms immediately and the whole run is about one bottleneck.

Nearest versus emptiest

The same hall run with both exit-choice rules, which produces visibly different jamming.

Failure run

A timer tight enough that the evacuation genuinely might not finish.

Flow gradient

A colour gradient across the crowd so moving and stuck regions are separable at a glance.

Door layout study

The same crowd against several door layouts, which is the real question crowd modelling exists to answer.

Make your first Crowd Evacuation 3D video

The order that works. Following it out of sequence usually means retuning settings you already set.
  1. 1.

    Set the crowd size

    Several thousand is the working range. Enough that the collective behaviour appears, few enough to run smoothly.

  2. 2.

    Choose the exit layout

    Door count, width and placement are the difficulty of the run and the shape of the jams.

  3. 3.

    Pick the exit rule

    Nearest door produces uneven loading and strong local jams. Emptiest door spreads the crowd and flows better.

  4. 4.

    Set the timer

    Tight enough that failure is possible, or the counter is a formality rather than a stake.

  5. 5.

    Colour for flow

    A gradient across the crowd so a viewer can see which part of the hall is stuck.

Settings that make the difference

  1. One narrow door is the most dramatic setup, because the arch forms immediately and never fully clears.
  2. Exit choice changes the run more than crowd size does. Try both rules before tuning anything else.
  3. Set the timer so failure is genuinely possible. A guaranteed success has no tension in the last ten seconds.
  4. A colour gradient across the crowd is the cheapest way to make flow and stagnation legible.
  5. The arches are emergent, so a run that jams badly is worth keeping rather than reshooting.

What breaks a run

  1. Wide doors and a generous timer, which produces an orderly evacuation with no jam and no stakes.
  2. A crowd so large it will not run smoothly, which costs frame rate without adding anything visible.
  3. A flat crowd colour, which makes it impossible to see where the flow has stopped.
  4. Hiding the timer or the counter, which removes both halves of the premise.

The jam nobody wrote

The most striking thing in an evacuation simulation is the arch that forms across a doorway. Bodies pressing toward a narrow gap end up wedged against each other in a curve, the arch holds under load, a small rearrangement releases it, and it reforms almost immediately.

It would be easy to fake, and faking it would be a mistake. Here it emerges from the social-force model: each person is pushed toward their exit and away from their neighbours, and at a doorway those two pressures produce exactly that structure. It is the classic clogging result and it is reproduced rather than drawn.

That is what makes the format honest. When the counter stalls, it stalls because several thousand independent agents have produced a jam, and a viewer watching it resolve is watching something the simulation discovered rather than something a designer scheduled.

Faster is slower

The counterintuitive result in crowd dynamics is that increasing individual urgency reduces total throughput. People push harder, the arch at each door strengthens, and fewer get out per second than would if everyone moved calmly.

That effect is present here, and it is the source of the mode’s best dramatic beat. As the timer runs down, urgency rises, and the flow gets worse exactly when it most needs to improve. The counter can freeze in the last ten seconds of a run that looked comfortable.

This is why the timer should be set tight enough that failure is possible. A generous timer produces an orderly evacuation that never triggers the effect, and the run becomes a queue rather than a crisis.

Crowd Evacuation 3D questions

Open Crowd Evacuation 3D

Every control on this page is already in the studio. Load the mode and start from a working run.